Hello everyone!
Thank you all for your lovely comments and well wishes on the birth of baby Jayden. He's been such a good baby so far, but he certainly is keeping me busy! I've been working on a few posts in the little spare time I have, and still need to get caught up on emails (sorry to those of you still awaiting a reply - it's coming I promise!), but in the mean time I've lined up a few guest posts for you. My first guest post for you comes from Kathia who writes the fabulous blog Pink Little Cake. Last year I did a guest post for Kathia and she's been nice enough to put together the post below for you all on how to decorate a baby shower cake. Kathia is also expecting a baby soon, so we've both got babies on the brain at the moment! So without further adieu, I'll now turn you over to Kathia who'll show you all how to make an adorable baby shower cake!
Hello Made with Pink readers, I am so happy to be here guest posting for Andrea while she is having a great time with her handsome baby boy.
My name is Kathia and my blog is Pink Little Cake, I make cupcakes and cookies but cake decorating is what I love the most. I blog because I like to share my passion with everyone and if someone can learn something from me along the way..even better.
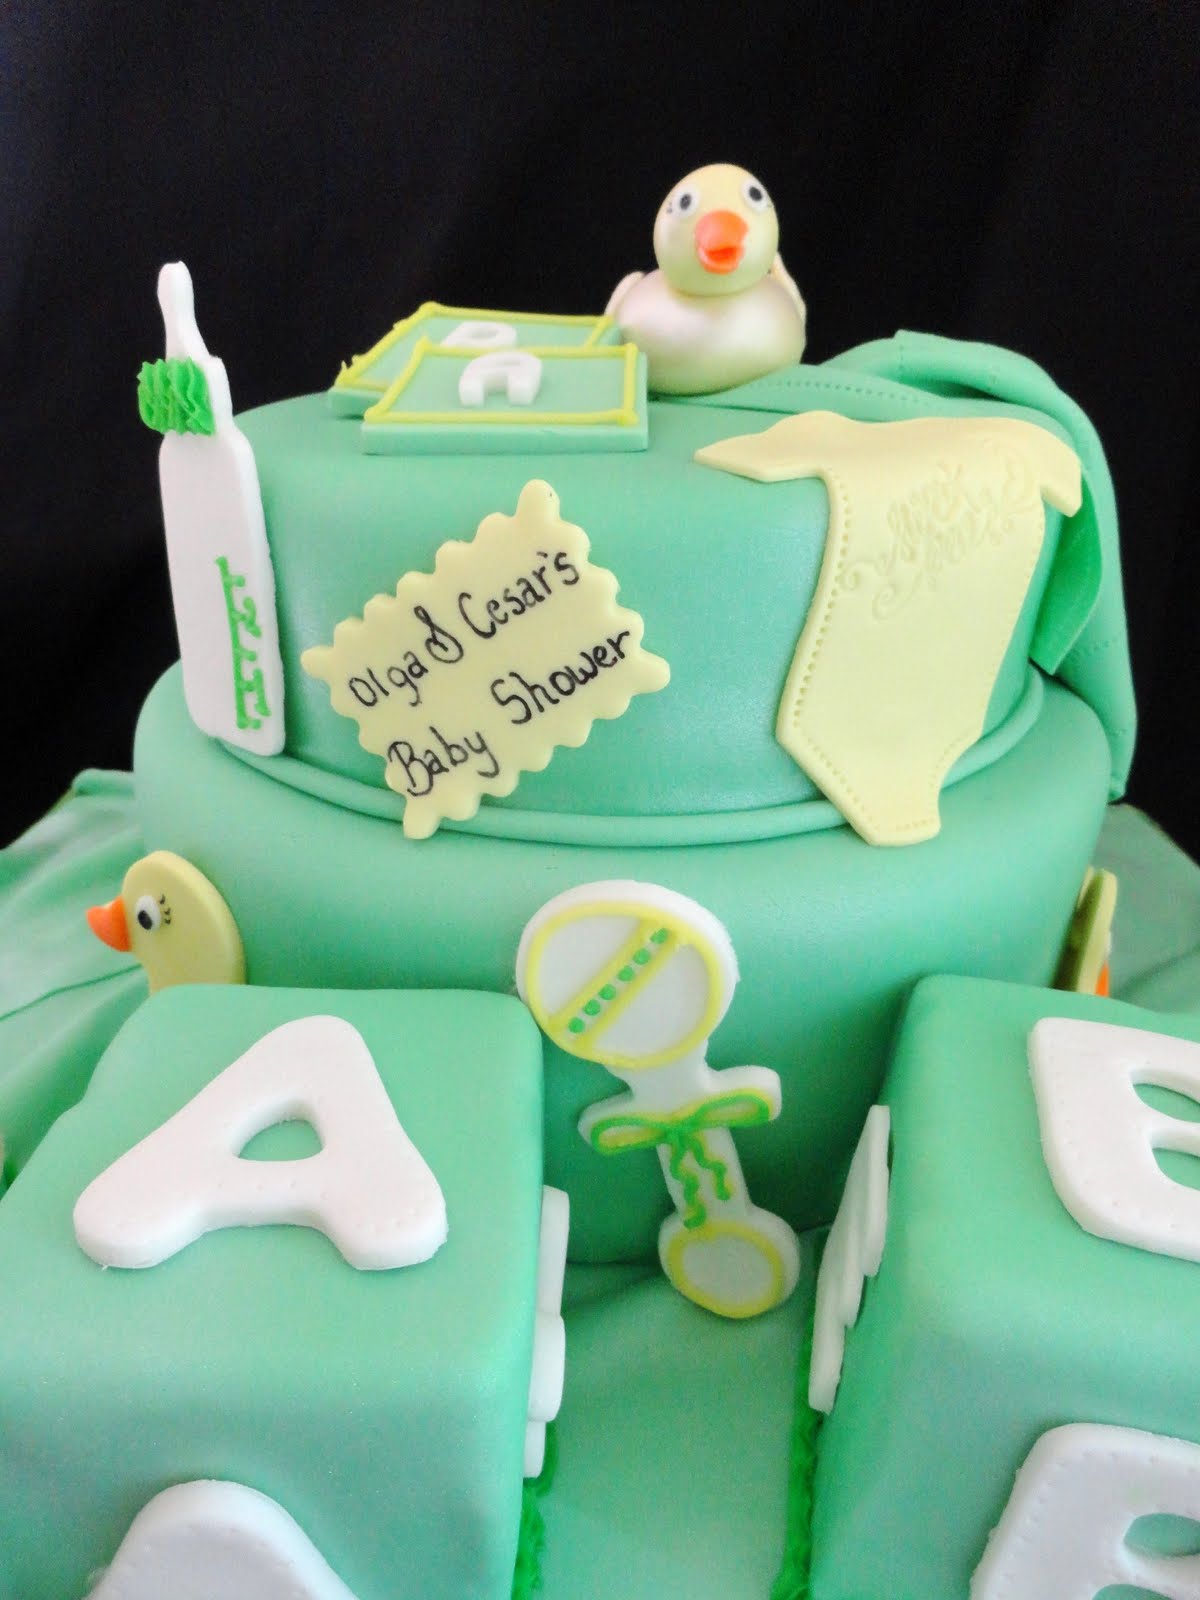
A few weeks ago I made this Duck baby shower cake for someone requesting the colors yellow and green. Since I am also having a baby in a few weeks I wanted to do something cute but nothing to complicated or labor intense. I came out with the idea of using cookie cutters, which are inexpensive and user friendly.
I love to use cookie cutters when decorating a cake! It cuts my working time in half instead of making a 3D figure.If you add enough details and color to the cut outs they end up looking so cute plus they are so easy to make
I am going to show you a few little tutorials making details of the cake using cookie cutters.

You need to start baking, filling, frosting and covering your cake in fondant.

Attach your cake to the cake board with royal icing and cover your cake board with fondant. I know some people like to cover their cake boards with royal icing, or they use a decorative cake board, I personally think that covering your cake boards matching the colors of your cake bring something extra special to your cakes.I f you notice in this picture that the cake is shiny is because I sprayed it with pearl luster dust before attaching the cut outs.

Making the bottle, blocks and rattle
Supplies needed:
•Gumpaste, color of your choice
•Bottle, rattle and square cookie cutters
•Tip #2
•Small start tip #24
•Royal icing (to attach cut outs on cake and to make details)
•Small letter cutters
•Water (to attach letter to blocks)


Making the Onesie and Bib:
Supplies needed:
•Small rolling pin
•Water ( to attach to cake)
•Royal icing ( for bib details)
•Stitching tool ( if you do not have one you can use a tooth pick)
•Onesie and Bib cookie cutter
•Rubber or clear stamps ( make sure you have use them ONLY for cake decorating purposes)
The day you are decorating the cake...
Making the onesie
1-Roll out the fondant
2-Cut the onesie with the cookie cutter
3-Add onesie detail using the stitching tool
4-Add impression detail with the stamp
5-Attach to cake with a dab of water


To make the bib
1-Roll out the fondant
2-Cut the bib with the cookie cutter
3-Add impression detail with the stamp
4-Attach to cake with a dab of water
5-Add details with royal icing

MAKING THE LITTLE DUCK
Supplies needed:
•yellow gumpaste for the duck
•orange fondant or gumpaste for the beak
•white fondant or gumpaste for "bubbles"
•small rolling pin
•duck cookie cutter
•royal icing
•water
•knife tool or tooth pick
•black edible writer
•small petal cutter (optional)
-To make the ducks roll out the yellow gumpaste and cut the ducks out with the cookie cutter, put them on top of parchment paper on a flat surface ( I used a cookie sheet) and let them dry for a few days.
-Roll the white gumpaste in your hands forming small "bubbles" and let them dry with the ducks.
The day that you are decorating the cake...
-Attach the duck to the cake with royal icing, then attach the bubbles.
-Roll out the orange gumpaste and using the cookie cutter cut the beak and attach to the duck with a dab of water.
-I wanted to add a few wings to the duck, the easier, the better!
-Roll out yellow gumpaste and using a small petal cutter cut the "wings" and make details with the knife tool or with a tooth pick.
-Attach to the duck with a dab of water.


Well, I hope you like this post and can use some ideas here to make your own cake.
Andrea, congratulations on your baby and thank you so much for giving me the opportunity to be here.
Comments
Post a Comment