
To be honest, I've never actually been to a street party before - I guess they're kind of like the North American block party, although to be honest I don't think I've ever been to one of those either. I don't think they're as popular there as they are here.

It's being reported that there will be over 10,000 official street parties throughout England and Wales, and that's not counting unofficial parties that haven't gone through the proper approval process through local councils.
On Sunday I'm hoping to attend one of the larger parties in my area that will take place in our favourite park. Monday and Tuesday are public holidays here, so the parties and celebrations will continue for a few more days.
In order to help make your street party look it's best all of the major stores have released their own lines of street party gear including the essentials such as bunting flags, paper plates, cups, napkins, cupcake cases, etc.
Each of the jubilee product lines are very patriotic and obviously incorporate everything British and royal such as union jacks and crowns, but they're also very different from each other.

Lakeland was kind enough to send me some products (above) from their Jubilee range, so I've featured some of them here with my latest street party inspired creations.
My street party snacks are the perfect addition to your Jubilee table - they're patriotic, three out of the four are quick and easy, you can make them all ahead of time, they're all very transportable, and best of all they taste great!!!
I've decided to split the recipes for my Jubilee treats into two separate posts, otherwise you'd be reading this post forever!

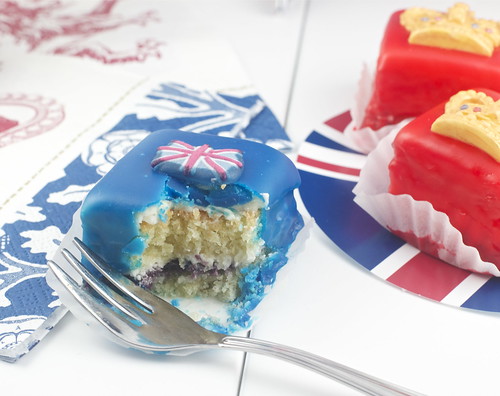
First up I'll start with my Diamond Jubilee petit fours. I've always wanted to make petit fours so when I was given some cute little London themed sugar decorations in a Waitrose goodie bag, I knew they'd be perfect to add on top. I used the traditional Victoria Sponge recipe that I came up with last year to celebrate the Royal Wedding, but this time I replaced the strawberry jam with black current jam - something I consider very British as it wasn't something I'd really ever come across in Canada.

Diamond Jubilee Petit Fours
Ingredients:
3/4 Cup + 2 Tbsp (200g) Castor Sugar
3/4 Cup + 2 Tbsp (200g) Butter, room temperature
4 Eggs
1.5 tsp Vanilla extract
1.5 Cups + 1.5 Tbsp (200g) Self Raising Flour
1/2 tsp baking powder
Blackcurrant Jam
Vanilla Buttercream
Ready to Roll Fondant - I used Renshaw Regal Ice White Chocolate flavour
Liquid Fondant - (I used the Silver Spoon powdered version that you mix with water)
Blackcurrant Jam
Vanilla Buttercream
Ready to Roll Fondant - I used Renshaw Regal Ice White Chocolate flavour
Liquid Fondant - (I used the Silver Spoon powdered version that you mix with water)
Liquid Glucose - optional
Red and Blue gel colouring
Decorations of your choice - I used Jubilee decorations from Waitrose and a couple of left over crowns I made for my Dome cake here.
Instructions:
1. Pre-heat oven to 350ºF (175ºC). Line two* square 8"x8" cake pans with parchment paper and set aside. Beat the butter and sugar together until light and fluffy (about 5-8 minutes).
*I divided my batter up, and made 6 cupcakes for another project and used the rest in a 9"x9" pan which made 16 petit fours approx 1.5"x1.5"
2. Add in the eggs 1 at a time to ensure they don't curdle the butter and sugar mixture. Beat well before adding each following egg. Beat in the vanilla extract.
3. Gently fold the self raising flour and baking powder into the butter, sugar and egg mixture until just combined. Don't over mix. Divide the batter equally between the two pans, making sure that the batter is as flat and even as possible. Bake for 20 - 25 minutes.
4. Let the cakes cool in their pans at before lifting them out by the parchment paper. Leave the parchment paper on your cake, and wrap it in cling film before placing it in the freezer for about an hour to firm up slightly.
5. While your cake is chilling in the freezer make your buttercream icing according to your favourite recipe. (I don't have a recipe for my buttercream - I just cream a block of butter and keep on adding icing sugar (with a nit of milk and vanilla) until it tastes right.
*The instructions below are for one 9x9 cake (as I mentioned above). If you've made two 8x8 cakes, follow the instructions below twice.
6. Take your cake out of the freezer ensuring that the bottom of the cake is facing upwards (this ensures you'll have a perfectly flat top) and slice it in half so you end up with two layers. I used a Wilton cake slicer, but a steady hand and knife should do the trick. Open your cake so that the freshly cut sides are facing up. Spread a thin layer of the balckcurrant jam on one half of the cake (remove any large currents), and a layer of buttercream on the other half (make sure it's as smooth as possible).
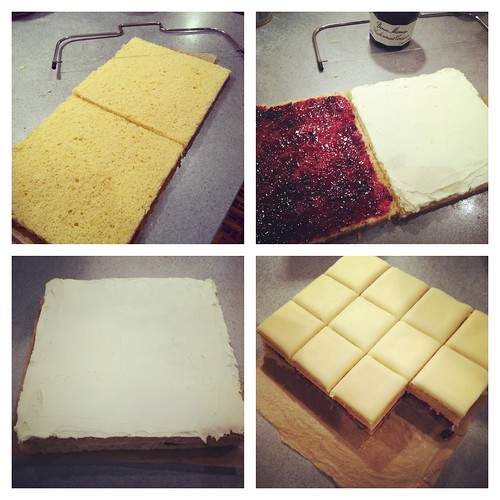
Roll out your fondant so it's about 3mm in thickness. Cut a square of fondant out the same size as your cake (you can use the bottom of your cake pan as a guide, and trim the edges later). Place the fondant over your buttercream covered cake top and smooth it out, ensuring you don't have any trapped air under the fondant. Trim off any excess fondant so that the edges are flush, and it's exactly the same size as the cake.
Cut your fondant covered cake into small squares - once trimmed, my 9x9 cake made 16 squares.
7. Prepare your liquid pouring fondant according to directions on the package - I added in about a teaspoon of glucose to mine to help make it spread easier. I used Silver Spoon brand which is available in most supermarkets, but you can also buy other bands at speciality cake stores. One 500g box was just enough to cover my 16 petit fours.
Place a 1/3 of your cake squares on a wire rack that's been placed over a baking dish. Start by pouring a tablespoon or two of the uncoloured white fondant on the top of one of your cake squares. Using an offset pallete knife, spread the fondant to the edges so it starts to flow down the sides of the cake. Using the back of the knife, scoop out a bit more fondant from the bowl and spread it down each side, starting from the top. Let the fondant run down the sides until all of the cake is covered.

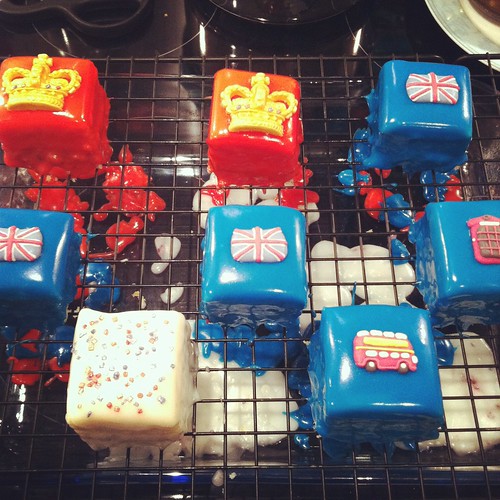
Ignore the random white one with sprinkles!
Divide the remaining fondant icing in half an colour one half red, and the other blue. Repeat the steps above for the rest of your cakes.
8. After the fondant has surface dried, use your palette knife to move each cake onto a paper liner. You can press the paper onto the fondant to help it form to the shape of the cake.
Leave your petite fours uncovered until they're thoroughly dry. I made mine in the evening, and I don't know what on earth possessed me to cover them in a sealed container but I did, and because my liquid fondant hadn't dried completely my sugar decorations absorbed some of the moisture which discoloured them. Obviously I wasn't thinking clearly!
These petit fours will keep at room temperature for up to 5 days if they're properly covered with liquid fondant to prevent them from drying out.
Check back later for my other Diamond Jubilee street party recipes!
Thanks to Lakeland for the Jubilee products (cake stand, napkins, cupcake cases and jam jar covers are featured), and to Waitrose for the Jubilee sugar decorations.
Comments
Post a Comment