Earlier I posted the recipe for my Diamond Jubilee Petit Fours, but I've got a few more street party / picnic treats to share with you as well!
These two recipes are super easy to make - NO baking required! So even if you think you're too busy over the bank holiday weekend to start messing around in the kitchen making treats, I can assure you that you've got time to make these!

First up are my Red, White and Blue Dessert Jars - they're dead easy. Layers of fresh blueberries, no bake cheesecake and chopped strawberries make these cute little jars the perfect picnic or street party dessert. They're highly portable!
Red, White and Blue Dessert Jars
Makes 3
Ingredients:
8oz (227g) Cream Cheese (don't use light, as it won't work the same)
2 Tbsp + 2 tsp (37g) Granulated / Castor Sugar
1/4 cup (60ml) Whipping Cream or Double Cream
1/4 tsp Vanilla Extract
Fresh Blueberries
Fresh Strawberries, chopped
3 Maison/Jam Jars
Instructions:
1. Wash and chop (chop strawberries only) your berries and set aside. To make the cheesecake filling, mix the cream cheese, sugar and vanilla using an electric mixer in a medium bowl until nice and smooth.
2. Whip the cream, and then fold the whipped cream into the cream cheese mixture so it's fully combined. Fold gently though - you don't want to loose all the air in the cream!
3. Refrigerate for about 15 minutes to firm up.
4. Fill the bottom of each jar with a handful or two of blueberries, so the jar is 1/3 full. Next spoon a few spoon fulls of the cheesecake filling on top of the blueberries so the jar is 2/3 full. Lastly, add your strawberries on top of the cheesecake layer to fill the remaining 1/3 of the jar. Refrigerate until ready to serve.

See! I told you these were easy! I covered the tops of my jars with these pretty Jubilee Jar Covers from Lakeland that they sent me. I also had a bag of Jubilee peanut M&M's that I used to fill up an extra jar I had, which helped make my street party feast extra festive!
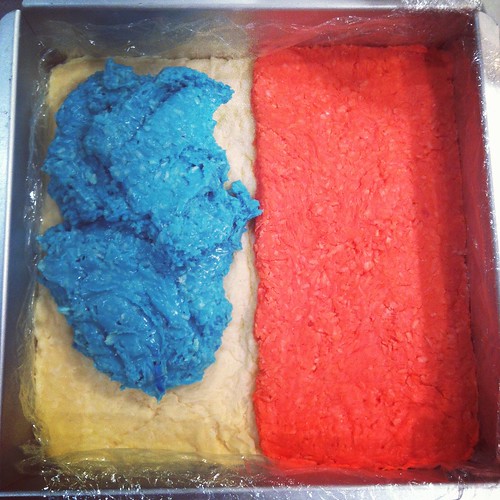
You may recall I made some baby blue coconut ice for my baby shower last summer, and the Diamond Jubilee was the perfect opportunity for me to make another special version of this retro British sweet. I've kept the white layer, but changed the traditional pink top layer to half red and half blue.
You may recall I made some baby blue coconut ice for my baby shower last summer, and the Diamond Jubilee was the perfect opportunity for me to make another special version of this retro British sweet. I've kept the white layer, but changed the traditional pink top layer to half red and half blue.

Diamond Jubilee Coconut Ice
Ingredients:
3 1/2 cups (560g) Icing Sugar
2 1/2 cups (200g) Shredded (Desiccated) Coconut
395g Can Sweetened Condensed Milk
1 tsp Vanilla Extract
Red and Blue Food colouring
Instructions:
1. Line the base and sides of a deep (4cm+) 19cm square dish with plastic cling wrap
2. Sift the icing sugar into large bowl. Stir in the coconut, condensed milk and vanilla extract.
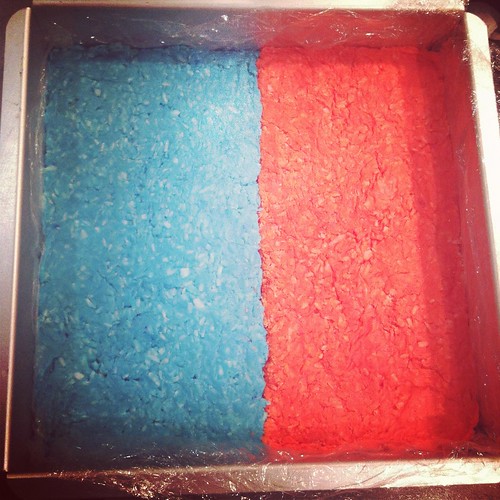
3. Press half of the mixture firmly into the base of the prepared pan. Take the second half of the mixture and divide it into two. Work the red food colouring into one half of the remaining mixture, and the blue colouring into the second half kneading well in order to distribute the colour evenly. Press the red mixture evenly over half of the white layer, and the blue mixture over the second half of the white layer. You can use a spatula to help smooth the top out.
4. Refrigerate for 3 hours or until firm. Remove the coconut ice from tray, peel away the cling wrap, and cut into squares. The coconut ice will keep for a week if stored in an airtight container.
I served my coconut ice in some pretty Jubilee cupcake cases that Lakeland sent me. They can be found here in case you're interested.
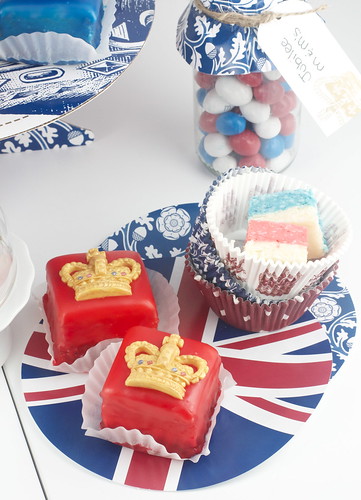
Hopefully my street party treats have inspired you all to make something red, white and blue to help celebrate the Diamond Jubilee in style! Have a fabulous holiday everyone!

Comments
Post a Comment