Firstly let me just say I totally get that Halloween has passed, and that we're now quickly approaching Christmas but I just had to post the Halloween cake I made a few weeks ago. I know it's late, but please don't let the black and orange scare you! You can totally customise this cake for Christmas, and I'd recommend doing so by switching the orange coloured icing to a milk chocolate one, and then sprinkling on some edible gold flakes on top of the ganache instead of the Halloween sprinkles.

That being said, I've wanted to make a big tall layer cake like this for a really long time now but I never really had a good excuse to make one until the other week. The thing with cakes like this is that they're big. Like really BIG. So when I found out my cousin was having a little get together at her place, I knew there would be plenty of mouths there to help eat it.
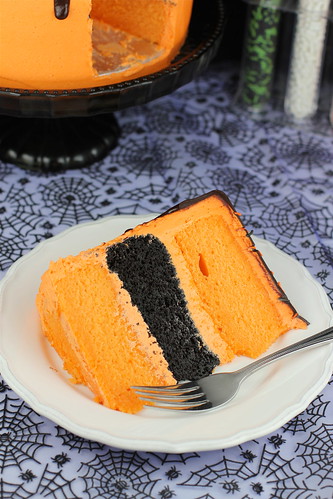
I knew I wanted to make an orange and black triple layer cake for Halloween, but I'd need to use a recipe that produced a cake dense enough to stack and support all three tiers. I turned to my copy of Sky High Cakes in order to find a suitable recipe since triple layer cakes feature prominently in the book. I settled on the Vanilla Buttermilk Cake which I dyed orange, and the Chocolate Mayonnaise Cake which I died black. I had originally wanted to swirl the two cakes together, but since I was using two different recipes I figured it was best to cook them separately just incase they required different baking times.
Since I was baking the two cakes separately I decided to try something else new in order to try and avoid having to level off my cakes. I hate levelling cakes! I can never seem to get them level or all the same height. BUT - I found a solution to this, and best of all it'll only cost you pennies! At first I thought about buying these Wilton Cake Strips, but I didn't want to fork out £10 for them, and then wait for them to ship. So I had a bit of a search on google and discovered that I could make my own using an old towel and some safety pins. All you need to do is take an old towel and cut it into strips that are long enough to wrap around the outside of your pan. You also want the strips to be about double the height of the pan so you can fold them in half length ways so they become the same height as the pan. One you have your towels cut to the proper length and width, then simply soak them in cold water for a minute or so and gently wring them out so they're still quite wet, but not dripping wet. Put them in the fridge to chill until you're ready to pour your batter in the pans. At that point, take the towels out of the fridge and wrap them around the outside of the cake pans. Secure the towel with a safety pin, and then pour your batter in and cook as you normally would. Your cakes will likely need to stay in the oven longer than they would normally since the wet towels slow down the cooking process, allowing the cakes to cook more evenly.

After I prepared my towels and got them chilling in the fridge I set out to make my cakes. The first one I made was the Vanilla Buttermilk cake which I tinted orange. I was really impressed with this recipe. The cake had a nice tight crumb, and was perfect for stacking one on top of the other. I scaled down this recipe so that it made two cakes instead of three since I was making a 3rd layer from a different recipe. And that different recipe used mayonnaise. YUCK! I hate mayonnaise with a passion. It's my nemesis, and the main reason why I don't eat the store bought sandwiches that are so popular here in the UK. Almost every single one contains mayonnaise. Thankfully the chocolate in the cake camouflaged any mayonnaise flavour that may have come through. I do have to say that the mayonnaise in this cake really helped to keep it incredibly moist, because in reality mayonnaise is mainly eggs and oil.
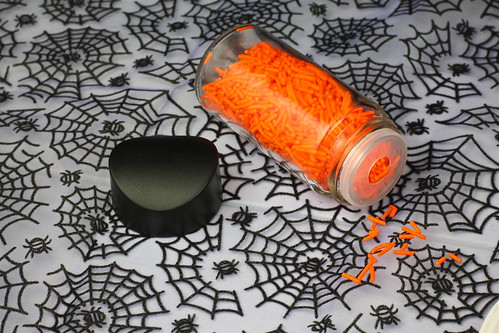
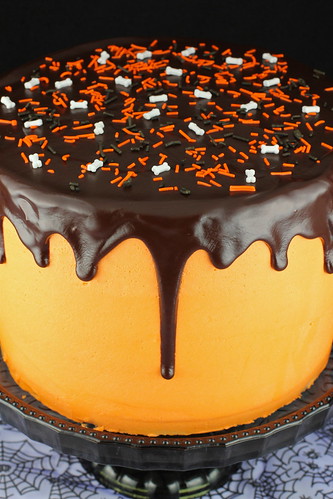
The wet towels really helped to keep my cakes nice and level so I didn't have to flatten them at all before layering them and assembling my cake. Once my cake was ready to ice, I covered it in a layer or orange buttercream. In situations like this most people would use an Italian Buttercream which is something I probably should have done, but I didn't want to mess around with the egg whites. So in order to get my buttercream perfectly smooth I used a large flat edged metal cake lifter that I'd heated in warm water to help achieve a really smooth finish on my cake. Lastly I made a chocolate ganache that I poured directly on top of my iced cake, pushed it towards the edges and really just hoped for the best. I was really pleased with the way my ganache "drips" turned out. I added some Halloween sprinkles using my fabulous new sprinkle shakers courtesy of Brabantia, which I blogged about here. I'm really picky about stuff like that, and admit to placing sprinkles on one at a time in order to get them just right, so I was pleased with the fact that these shakers really distributed my sprinkles so evenly.
I loved the way this cake turned out, so do yourself a favour and bake it for your friends and family this Christmas. Leave out the orange and black food colouring, add on some golden glitter and you're set!
Vanilla Buttermilk Cake
Slightly adapted from Sky High Cakes
Ingredients:
4 Eggs + 2 Yolks, room temperature
1 1/4 Cups (295ml) Buttermilk, room temperature
2 tsp (10 ml) Vanilla Extract
3 Cups (360 g) Cake Flour, sifted
2 Cups (475 g) Sugar
4 1/2 tsp Baking Powder
1/2 tsp Salt
1 cup (227 g) Butter, room temperature
Orange Food Colouring (optional)
Instructions:
1. Preheat oven to 350°F (175ºC). Grease two 8 inch (9 inch will work as well) round cake pans, and line bottoms with parchment paper.
2. In a medium bowl, combine the whole eggs and yolks, along with 1/4 cup of the buttermilk, the vanilla and the food colouring and mix until well combined. Set aside.
3. In a separate large mixing bowl combine the flour, sugar, baking powder and salt in a large mixer bowl and whisk to blend.
3. Add the butter and the remaining 1 cup of buttermilk to the dry ingredients and mix on low until just combined. Increase the mixer speed to medium and beat until light and fluffy. Pour the egg mixture in 3 equal parts until thoroughly incorporated.
4. Divide the batter evenly among the two prepared pans, and bake the cakes for 30-40 mins for the 8 inch cakes, or 28-34 minutes for the 9 inch cakes. If you wrapped your cake pans in the wet towels like I did, then they may take longer to bake so just make sure your cake tester or wooden toothpick comes out clean and that the cake begins to pull away from the sides of the pan. Let the cakes cool completely in the pans before you remove them.
Chocolate Mayonnaise Cake
Halved from the original recipe in Sky High Cakes
Ingredients:
1 Cup + 2 Tbsp (150g) Flour
1/2 Cup (60g) Cocoa Powder
1 1/8 tsp Baking Soda
1/2 + 1/8 tsp Baking Powder
1/2 tsp Salt
1/4 tsp Cinnamon
1 1/4 oz (36g) Dark Chocolate, chopped
1/2 Cup (125ml) Whole Milk
1/2 Cup + 2 Tbsp (185ml) Hot Strongly Brewed Coffee
1 Egg
1/2 Cup (110g) Mayonnaise* (NOT low fat or fat free)
3/4 tsp Vanilla Extract
1 Cup + 2 Tbsp (255g) Sugar
Black Food Colouring (optional)
Instructions:
1. Preheat the oven to 350ºF (175ºC). Grease one** 8 inch (9 inch will work as well) round cake pan, and line bottoms with parchment paper.
2. Sift the flour, cocoa powder, baking soda, baking powder, cinnamon and salt together and set aside.
3. Put the chopped chocolate in a medium heatproof bowl. Bring the milk to a simmer. Pour the hot milk and coffee over the chocolate and let it stand for a minute, then whisk until smooth. Let the mixture cool slightly.
4. In a large mixing bowl, beat the eggs, mayonnaise, vanilla and black colouring together until well blended. Gradually beat in the sugar. Then add the dry ingredients and mocha liquid alternating in 2 or 3 additions, beating until smooth and well blended. Pour into your prepared pan(s)
5. Bake for 35 to 40 minutes, or until a cake tester inserted in the centre comes out clean. Let the cake cool completely in the pans before you remove them.
Notes: *Do not use Miracle Whip or low fat mayo - you must only use full fat mayo due to the oil content. ** I cut the original recipe for this cake in half - the full recipe made three 8 inch cakes, but I used all of the recipe above to fill one 8 inch pan so it was quite thick. I would recommend wrapping the pan in a wet towel as I explained in the previous Buttermilk Cake recipe to help the cake bake evenly. If you decide not to wrap the pan in wet towels then I would suggest either dividing the batter between two 8 inch pans, or using some of the batter to make six cupcakes so that the 8 inch cake isn't too thick. If you look at the pictures you can see that the middle chocolate layer of the cake has sunk down in the middle slightly. This happened after the cake was done baking because it was so moist.
Vanilla Buttercream
Ingredients:
1 Cup (250g) Butter, room temperature
5 3/4 Cups (700g) Icing Sugar, sifted
2 - 4 Tbsp Milk
1 1/2 tsp Vanilla
Orange Food Colouring
Instructions:
1. In a large mixing bowl, beat the butter on high until creamy (approx 1 - 2 mins).
2. Add the icing sugar one cup at a time, beating on medium speed until each cup of icing sugar is fully incorporated before adding the next. When the icing starts to stiffen, add in the orange colouring, vanilla and half of the milk, continue to mix. Continue adding the remainder of the icing sugar bit by bit, alternating with the remainder of the milk as necessary. If you find that the icing is still too stiff, add an additional tablespoon(s) of milk until the icing is a nice soft and fluffy consistency.
Chocolate Ganache
Ingredients:
6 oz (170g) Dark Chocolate, finely chopped
4 oz (120ml) Whipping Cream
1/2 oz (14g) Castor Sugar
1 tsp Butter
Instructions:
1. Place the finely chopped chocolate in a medium heat proof bowl and set aside.
2. Combine the whipping cream and sugar in a small saucepan and heat over medium heat until it has reached a simmer. Remove from the heat, add in the butter and stir to combine.
3. Pour the hot cream mixture directly on top of the chopped chocolate and let stand for 5 minutes. Stir from the centre until completely smooth. Let the ganache sit at room temperature for 30-60 minutes, or until it reaches a thick but pourable consistency.
While the ganache is setting, follow the directions below to assemble the cake.
To Assemble The Cake:
Tools:
8 inch cake drum (or drum the exact size of your cake)
Small offset metal spatula
Wilton Cake Lifter (or large metal scraper)
Large bowl of very hot water (wide enough to fit the edge of your cake lifter)
Decorating turntable
Sprinkles of your choice
1. Once cool, remove your cakes from the pan and set aside. Place the cake drum in the center of your turntable. Smear a dollop of buttercream across the top of your cake drum (this will ensure your cake does not slip off of the drum). Then place the first layer of your cake on top of the buttercreamed drum ensuring that the flattest side of the cake is facing upwards.
2. Spread a layer of buttercream across the top of your first cake making sure that the icing is pushed all the way to the top edge of the cake. Place the second layer of the cake on top of first so the buttercream is sandwiched in between. Follow the same steps above until you’ve got all three layers nicely stacked on top of each other.
3. Start covering the cake in buttercream by using your offset spatula to coat the top and sides of the cake. Use quite a thick coating on the sides, and don’t worry about it being messy – we’ll fix that later. I found the best technique for coating my cake was to start with the top and spread the icing across the top of the cake, and out past the edges. Then do the sides by taking a big dollop of icing on the top of your offset spatula and coat small side sections before going back for another dollop of icing (make sure to scrape off your spatula each time you go back for more icing to avoid getting crumbs mixed in). Repeat this until the cake is fully covered, making sure to also cover the edges of the silver cake drum.
4. Once your cake is fully covered, smooth out the top so it’s nice and level by holding a clean offset spatula in place on top of the cake at a 45 degree angle, and rotate the turntable so the cake is turning but your spatula is not. This should get the top of your cake fairly smooth, but don’t worry If it’s not perfect.
5. To get the sides of your cake nice and smooth you’ll need to use the metal cake lifter or scraper. Start off by dipping the end of the lifter in a bowl of hot water. Remove the cake lifter from the water and quickly dry it with a towel. Hold the scraper with the bottom edge resting against the turntable, and the widest end edge against the side of the cake at a 45 degree angle. Slowly rotate the turntable a full 360 degrees. The heat from the metal scraper should warm the icing enough to give a smooth finish. Do not stop rotating the turntable until you’ve made one full turn in order to avoid messing up your smooth finish. If you’re not happy with the finish you can always go back and repeat the process until your happy with it.
6. To finish off the top of the cake use a clean offset spatula held at a 45 degree angle to smooth down any edges around the top. Start from the outside edge and work in towards the center ensuring that your top is now as smooth as possible. Your cake should be very smooth, but don’t worry if the top or edges aren’t perfect because they’ll be covered with the chocolate ganache. Place the cake in the fridge and chill for 30 minutes, or until the icing is firm.
7. If you plan on displaying your cake on a cake stand, use a clean cake lifter to carefully slide the chilled cake onto the stand. Now you’re ready to decorate the top! Make sure your chocolate ganache is a thick, but flowing consistency. Carefully pour about 1/2 – 3/4 cup of the ganache directly in the center of the top of your cake. Use a clean offset spatula to help spread the ganache to the very edges, and then corss your fingers and hope for the best as it drips it’s way down the cake. The key here is to use just enough ganache so that the drips stop within the top half of the cake. If you use too much ganache you risk having it drip down and pool at the bottom of your cake.
8. While the ganache on top of your cake is still melted, add on your sprinkles of choice. I used a selection of mini white bones and some orange and black sprinkles that I shook on using my new sprinkle jars. The jars were brilliant at evenly distributing just the right amount of sprinkles on top of my cake.
Like I mentioned above, I think this cake would look amazing if the orange icing was replaced with a milk chocolate icing, and chunky gold fakes were used on top rather than the Halloween sprinkles I used. A perfect treat for Christmas!
Comments
Post a Comment