
Last week was my dad's 65th birthday. It's quite a milestone you know - I've been informed that in Canada once you hit 65 you're entitled to a bunch of free stuff including free weekday rides on the BC Ferries, free coffee at various restaurants, no fee bank accounts and free flu shots. Pretty exciting stuff huh!?
I felt that turning 65 deserved some kind of celebration and acknowledgement, and I wanted to get my dad a gift, but he always seems to have everything. And besides, he's always saying that he has too much "stuff", so has been trying to de-clutter their house for ages. So instead, I decided to bake him a cake. But since I wasn't able to fly home to Canada to bake my dad a birthday cake, I decided to bake him one here in England. The only downside is he won't be able to taste it, but I'm including the recipe below, so hopefully my mom will make it for him instead (hint hint).
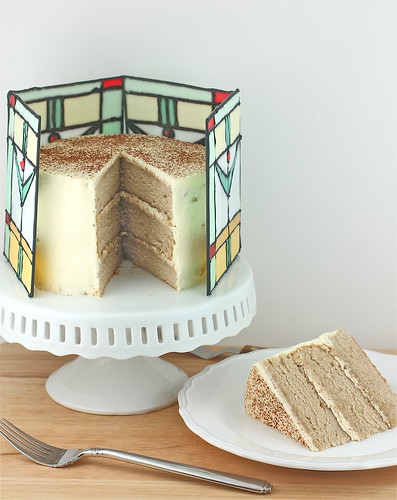
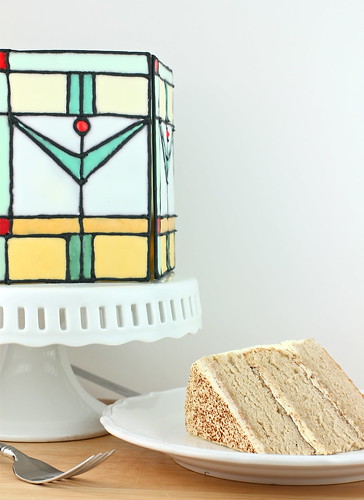
I wasn't sure what type of cake to bake, but I figured something more visually appealing would be better given the fact that he wouldn't be able to taste it. So I thought about the things my dad liked (espresso, arts and crafts style stained glass, and wood), and then combined them into a cake. OK, I actually just set the cake on a wooden cutting board - you didn't actually expect me to bake wood in my cake did you?
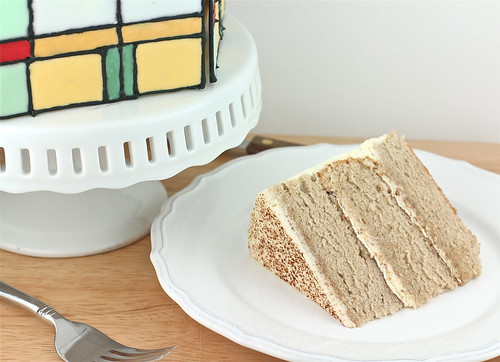
I decided to bake a Cappuccino Chiffon Cake, and it was delicious. I'd never made a chiffon cake before, but it turned out great! So light and fluffy. And very similar to an Angel Food Cake, except it included egg yolks. Each layer of cake was doused with espresso syrup and then topped with a layer of vanilla whipped cream and a sprinkling of cocoa and cinnamon to simulate a cappuccino.
Baking the cake was the easy thing. The stained glass panels.... those are a whole other story.

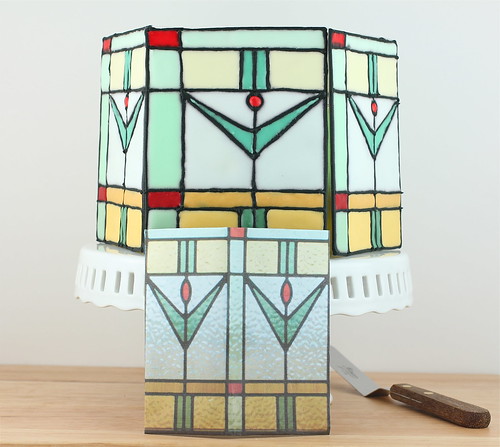
I had originally tried to make the stained glass panels out of fondant, but after trying to cut out only 3 of the small rectangles I decided that fondant wasn't the way to go and opted to make the panels out of royal icing transfers instead. I found a design that I liked online (from here) and drew out a template on some paper. Then I placed some plastic page protectors over top of my template and piped the outlines with black royal icing. After allowing the outlines to dry overnight I filled each section with coloured royal icing and left them again to dry for 24 hours.
.JPG)
.JPG)
Unfortunately they still weren't totally dry, and I lost one of the panels because it cracked in several spots when I tried to remove it from the plastic. I googled what the best way to dry royal icing quickly was, and came across several sources that recommended I leave the panels in an oven with only the light on. I did that, but unfortunately I don't think that was the best decision because the black ink really bled into the some of the coloured panels over the coarse of the day while they were in the oven. --> Insert frowny face here :-(
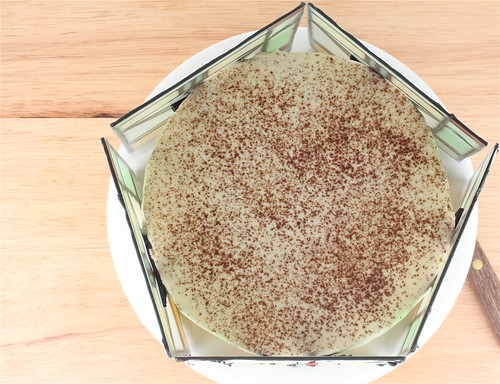
.JPG) The next day when the icing was fully dry I was able to carefully peel the plastic backing away from the icing transfers and place them around the cake using some leftover icing as glue.
The next day when the icing was fully dry I was able to carefully peel the plastic backing away from the icing transfers and place them around the cake using some leftover icing as glue.

In order for the royal icing panels to dry before I put them on the cake I had to pipe them several days before I actually baked the cake. This meant I had to take a guess at the height my cake would be. I guessed wrong. My panels were a bit taller than the cake (although I do think my cake shrunk down when it settled overnight), but I actually didn't mind it at all. My husband on the other hand thinks it looked awful and that it was poor planning on my part. I think he's lucky I even let him have a slice of it after he voiced his concerns :-|

The recipe for this cake comes from the book Sky High: Irresistible Triple-Layer Cakes. This is the third recipe I've made from Sky High Cakes and they've all been fabulous, so I highly recommend this book.
Cappuccino Chiffon Cake
Ingredients:
Chiffon Cake:
1/4 Cup (60ml) Vegetable Oil
6 Eggs, separated
6 Tbsp (90ml) Espresso, freshly brewed and cooled to room temperature
2 tsp Vanilla Extract
1 1/3 Cups (167g) Cake Flour (or cake flour substitute - see here)
1 1/2 Cups (340g) Castor Sugar
1 tsp Baking Powder
1/2 tsp Cinnamon
1/2 tsp Salt
1/2 tsp Cream of Tarter
Espresso Syrup (recipe below)
Vanilla Whipped Cream (recipe below)
Cocoa powder or ground cinnamon, for dusting
Instructions:
1. Preheat the oven to 350ºF (180ºC). Line the bottoms of three 8-inch round cake pans with rounds of parchment or waxed paper but do not grease.
2. In a medium bowl, combine the oil, egg yolks, espresso and vanilla; whisk lightly to blend. In a large mixing bowl, sift together the flour, 1 cup of the sugar, the baking powder, cinnamon, and salt; set the dry ingredients aside.
3. In a large mixer bowl with an electric mixer, whip the egg whites with the cream of tartar on medium-low speed until frothy. Raise the mixer speed to medium-high and gradually add the remaining 1/2 cup sugar. Continue to beat until soft peaks form; do not whip until stiff or the cake will shrink excessively upon cooking.
4. Add the espresso-egg yolk mixture to the dry ingredients and fold together just enough to combine. Add one-fourth of the beaten egg whites and fold them in to lighten the batter. Fold in the remainder of the whites just until no streaks remain. Divide the batter among the 3 prepared pans.
5. Bake the cakes for about 18 minutes, or until a cake tester or wooden toothpick inserted in the center comes out clean. Allow to cool upside down completely in the pans. When cooled, run a blunt knife around the edge of the pans to release the cakes. Invert onto wire racks and remove the paper liners.
6. To assemble the cake, place one layer, flat side up, on a cake stand or serving plate. Soak the cake with 1/3 cup of the Espresso Syrup. Spread about 1-1/3 cups of the whipped cream evenly over the top of the layer. Repeat with the next layer and more syrup and whipped cream. Finally, top with the third layer. Soak it with the remaining syrup and frost the top and sides with the remaining whipped cream. (I didn't use nearly the whole amount)
7. To decorate the cake, smooth out the cream as much as possible on thop with an offset spatula. Lay a paper lace doily over the top of the cake and sift cocoa or cinnamon over the doily. Carefully lift off the doily to reveal the lacy stencil on top of the cake.
Espresso Syrup:
1/3 Cup (78ml) Espresso, hot & freshly brewed
1/3 Cup Dark Rum (I used plain water instead)
1/3 Cup (83g) Sugar
Instructions:
In a bowl, stir together the espresso and sugar until the sugar dissolves. Add the rum and let cool to room temperature.
Vanilla Whipped Cream: (I only used half the recipe for a 6 inch cake)
3 Cups (750ml) Double Cream or Whipping Cream
1/3 Cup (83g) Sugar
2 tsp Vanilla Extract
Instructions: Put the cream, sugar, and vanilla in a large chilled mixing bowl with chilled beaters. With the whip attachment, whip the cream until stiff peaks form.
.JPG)
.JPG)
.JPG)
Ingredients:
Chiffon Cake:
1/4 Cup (60ml) Vegetable Oil
6 Eggs, separated
6 Tbsp (90ml) Espresso, freshly brewed and cooled to room temperature
2 tsp Vanilla Extract
1 1/3 Cups (167g) Cake Flour (or cake flour substitute - see here)
1 1/2 Cups (340g) Castor Sugar
1 tsp Baking Powder
1/2 tsp Cinnamon
1/2 tsp Salt
1/2 tsp Cream of Tarter
Espresso Syrup (recipe below)
Vanilla Whipped Cream (recipe below)
Cocoa powder or ground cinnamon, for dusting
Instructions:
1. Preheat the oven to 350ºF (180ºC). Line the bottoms of three 8-inch round cake pans with rounds of parchment or waxed paper but do not grease.
2. In a medium bowl, combine the oil, egg yolks, espresso and vanilla; whisk lightly to blend. In a large mixing bowl, sift together the flour, 1 cup of the sugar, the baking powder, cinnamon, and salt; set the dry ingredients aside.
3. In a large mixer bowl with an electric mixer, whip the egg whites with the cream of tartar on medium-low speed until frothy. Raise the mixer speed to medium-high and gradually add the remaining 1/2 cup sugar. Continue to beat until soft peaks form; do not whip until stiff or the cake will shrink excessively upon cooking.
4. Add the espresso-egg yolk mixture to the dry ingredients and fold together just enough to combine. Add one-fourth of the beaten egg whites and fold them in to lighten the batter. Fold in the remainder of the whites just until no streaks remain. Divide the batter among the 3 prepared pans.
5. Bake the cakes for about 18 minutes, or until a cake tester or wooden toothpick inserted in the center comes out clean. Allow to cool upside down completely in the pans. When cooled, run a blunt knife around the edge of the pans to release the cakes. Invert onto wire racks and remove the paper liners.
6. To assemble the cake, place one layer, flat side up, on a cake stand or serving plate. Soak the cake with 1/3 cup of the Espresso Syrup. Spread about 1-1/3 cups of the whipped cream evenly over the top of the layer. Repeat with the next layer and more syrup and whipped cream. Finally, top with the third layer. Soak it with the remaining syrup and frost the top and sides with the remaining whipped cream. (I didn't use nearly the whole amount)
7. To decorate the cake, smooth out the cream as much as possible on thop with an offset spatula. Lay a paper lace doily over the top of the cake and sift cocoa or cinnamon over the doily. Carefully lift off the doily to reveal the lacy stencil on top of the cake.
Espresso Syrup:
1/3 Cup (78ml) Espresso, hot & freshly brewed
1/3 Cup Dark Rum (I used plain water instead)
1/3 Cup (83g) Sugar
Instructions:
In a bowl, stir together the espresso and sugar until the sugar dissolves. Add the rum and let cool to room temperature.
Vanilla Whipped Cream: (I only used half the recipe for a 6 inch cake)
3 Cups (750ml) Double Cream or Whipping Cream
1/3 Cup (83g) Sugar
2 tsp Vanilla Extract
Instructions: Put the cream, sugar, and vanilla in a large chilled mixing bowl with chilled beaters. With the whip attachment, whip the cream until stiff peaks form.
This cake was so nice and spongy I'd definitely make it again, but the stained glass panels took forever to do. To be honest, I probably wouldn't make them again if you paid me. I would however suggest trying the royal icing transfer technique for something smaller - I will!
Comments
Post a Comment