Earlier in the week I showed guys some pictures of the Very Hungry Caterpillar Party I thew for my son's 2nd birthday. The positive response and the lovely comments that everyone gave were a welcome surprise, and really just confirmed why I love to do these parties!

I loved creating all of the desserts for Jayden's Very Hungry Caterpillar party and I was really pleased with the way they turned out, especially the caterpillar cake topper I made. I know from my many hours on Pinterest that Very Hungry Caterpillar themed birthday parties are pretty popular, so I thought I'd show you all how I made the Very Hungry Caterpillar cake topper.
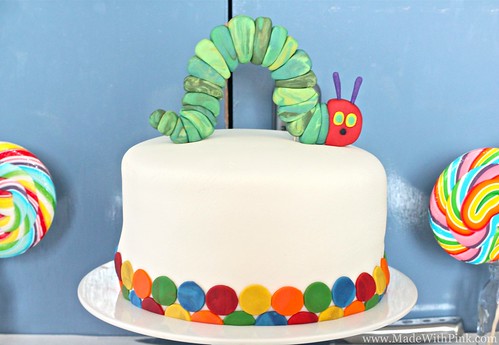
The Very Hungry Caterpillar Birthday Cake Topper Tutorial
Materials:
- Green fondant in a variety of different shades - I used at least 4 - 5 shades of green totalling about 200g, and a variety of colourings from Wilton and Americolor
- Red fondant - about the size of a golf ball
- Purple fondant for the antenna
- Yellow fondant for the eyes
- Black fondant for the nose
- Edible glue** (recipe below)
- Cocktail sticks
- A non-stick mat such as a silpat or a cutting board covered in cling film
- Tylo powder* - optional (see note below)
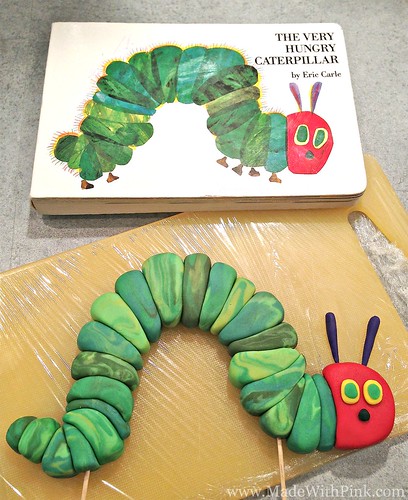
- A picture (or a copy of the book) of the Very Hungry Caterpillar to refer to
Instructions:
1. Take a small chunk (about the size of a small grape) of one of the green fondants, roll it into a ball and set aside. Next tear off some small pieces (about the size of a pea, or slightly larger) from 2 - 3 of your other green fondants. *You can knead a little bit of tylo powder into your fondant to help it harden - this will help reduce the overall drying time, which can take 2+ weeks.
2. Take the small pea sized pieces and stick them randomly around the outside of your larger green fondant ball.
3. Roll the ball in the palm of your hands a couple times so all of the shades of green are stuck to themselves. Then start to pinch the ball carefully, pulling and twisting out with your fingers before pushing the pulled part of the fondant back onto the ball. Do this once or twice, and then continue roll the ball so the colours blend slightly to create a marbled effect.

Follow the example above with the exception of the last picture which has been rolled out
flat so I could use it for the pear cupcake topper.
4. Refer to your picture of the Very Hungry Caterpillar, and form the marbled ball of fondant into a similar shape to the end tail piece of the caterpillar. Set aside on a non-stick mat.
5. Take another chunk (just slightly larger than the previous one) from one of your green fondants, and repeat the process from step 3. Gently squeeze the sides of the marbled fondant ball between your thumb and index finger and shape so that it's slightly flat on each side. Brush a small amount of edible glue on the right edge of the first fondant piece you formed, and stick it to the second piece you've made so the two pieces are stuck together. This will start to form the tail end of the caterpillar. Lay the fondant pieces that you've stuck to dry on your non-stick mat, and pat down the tops lightly so they're just slightly flat.

7. To make the head take a piece of red fondant and roll it into a ball. Flatten the ball slightly so it's the same width as caterpillar body pieces. Cut the left 1/3 off of the flattened circle, and round the edges with your fingers making sure to leave a flat side to attach the body to it. Brush the flat side of the head with edible glue and attach it to the green body.
8. Poke two holes in the top of the caterpillar's head (make sure they're not too big!).
9. Take a two small pieces of purple fondant and roll them so they're about an inch long, leaving one end pointer than the other. Set aside to dry.
10. Make the eyes by taking very small pieces of yellow fondant, roll them into tiny balls and flatten them. Brush the backs with edible glue and stick them onto the red caterpillar head. Next take 3 tiny pieces of green fondant, roll them into tiny balls and flatten them. Brush with edible glue, and place two of the pieces on top of the yellow eyes you just made, and the other one as the caterpillars nose.
12. Once the antenna are dry, brush the pointy tips with edible glue and place them into the holes you poked in the caterpillars head. *Save this until you are just about to place the caterpillar on the cake to prevent the antenna from snapping off.
Edible Glue Recipe
Ingredients:1/4 tsp Tylo Powder
1 - 2 Tbsp Water
Method:
1. Pour the water into a very small plastic container or jar with a lid. Mix the tylo powder in with the water (I usually place the lid on the container and shake vigorously) and leave in the fridge for a few hours or overnight until the powder is fully dissolved.

Hopefully I explained everything clearly, but feel free to leave a comment underneath if you need clarification on anything.
Also, a few of you have asked how I did my fruit cupcake toppers, so I'll be telling you how to make those in a separate upcoming post.
Comments
Post a Comment